
Introduction
In this article we are going to see how to configure a system composed of the following parts:
- A backend app (ASPNET Core Web Api).
- A frontend app that is consumer facing (Blazor WASM).
- A frontend app that is used for admin duties (Blazor WASM).
- A web server used as a reverse proxy (NGINX).
- A secured connection via SSL certificates issued by a certificate authority (Let's Encrypt).
- All of the above running on docker containers for ease of deployment.
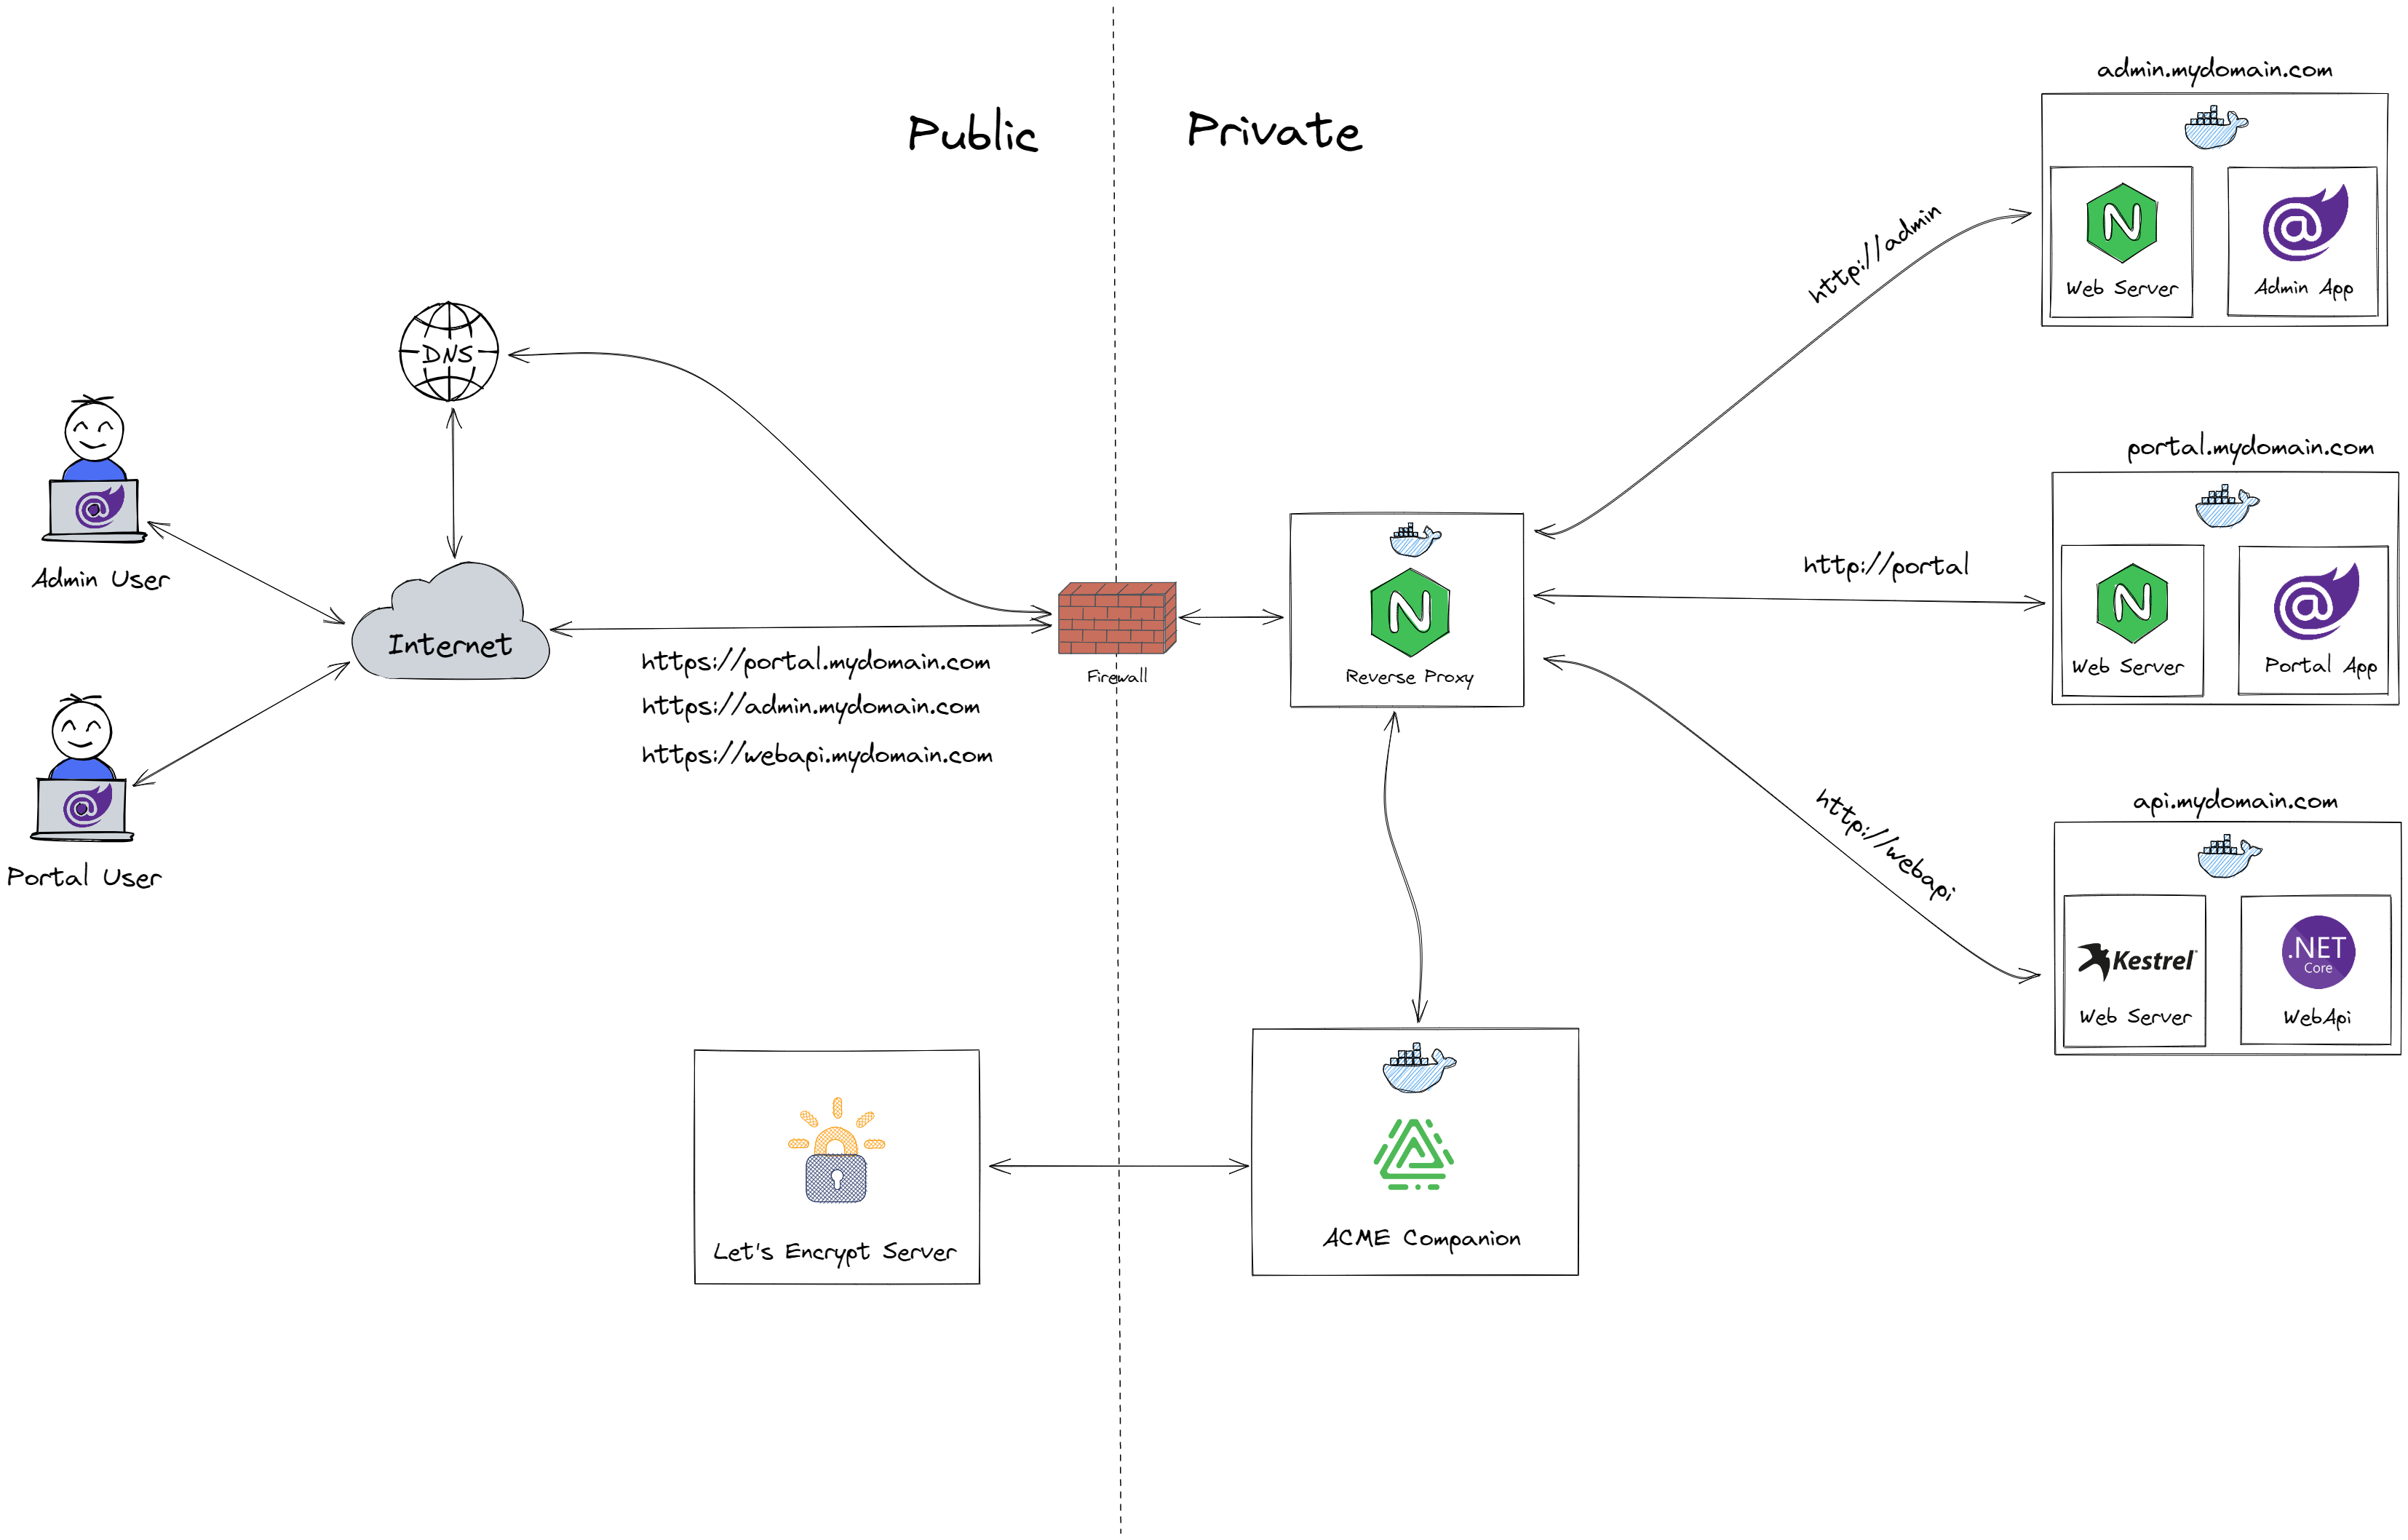
Understanding the flow
Let's try to read the diagram above from left to right. In the far left we have two users, one using the admin app which is a Blazor WASM application, and the other one using the consumer app which is also a Blazor WASM application. They make requests to admin.mydomain.com and portal.mydomain.com respectively.
There are also requests to api.mydomain.com, but these are being made from both Blazor apps in order to send and retreive data from the Web Api.
All requests are hitting our middle man NGINX, which is acting as a reverse proxy. You can see a dotted line indicating the visibility boundary of the system. NGINX is running within a docker container, and is exposing ports 80 and 443. Both ports are exposed because we want to allow the Blazor users to access our system via http, NGINX will automatically redirect the calls to https.
Everything in the private boundary is running in docker containers, they also share the same bridge network for ease of communication.
On system startup, the ACME Companion container puts a file on NGINX. That file contains a token, plus a thumbprint of the account key. The ACME companion tells the Let’s Encrypt server that the file is ready, afterwards Let’s Encrypt tries retrieving it. Once the check gets the right response, the validation is considered successful and our certificates are issued (we need 3, one for each of our apps).
A NGINX instance running directly in the host OS, would route requests based on the subdomain (portal, admin, api) to respective subfolders whereby routing calls properly. But thats not what we are after for, because we would need to publish and deploy our apps to this NGINX instance, and that would be an extra step during deployment.
The idea is to have sepparate NGINX instances operating as web servers (not as reverse proxies) in order to serve our files for the Blazor apps. Also serving our Web Api via Kestrel (the built-in web server shipped with .NET).
Since all of them are running in containers, sharing the same bride network, our reverse proxy can reach them by the container name. All communication within the docker network can be in http since there is no risk of access from outside as all calls go through the reverse proxy.
Prerequisites
- You need to own a domain beforehand.
- The subdomains you want to issue certificates for, must correctly resolve to the host.
- Your DNS provider must answer correctly to CAA record requests.
- Your host must be publicly reachable on both port 80 and 443.
Admin configuration
We need two files for this project.
- A Docker file to containerize our app.
- A NGINX configuration file to tell it how to server our app's files.
Dockerfile
In the root of the project we add a file called Dockerfile, with the following code.
FROM mcr.microsoft.com/dotnet/sdk:6.0 AS build
WORKDIR /src
COPY ["Admin/Admin.csproj", "Admin"]
RUN dotnet restore "Admin/Admin.csproj"
COPY . .
WORKDIR "/src/Admin"
RUN dotnet build "Admin.csproj" -c Release -o /app/build

FROM build AS publish
RUN dotnet publish "Admin.csproj" -c Release -o /app/publish

FROM nginx:alpine AS final
WORKDIR /usr/share/nginx/html
COPY --from=publish /app/publish/wwwroot .
COPY ["Admin/nginx.conf", "/etc/nginx/nginx.conf"]
Let's break it down into sections.
FROM mcr.microsoft.com/dotnet/sdk:6.0 AS build
WORKDIR /src
COPY ["Admin/Admin.csproj", "Admin"]
RUN dotnet restore "Admin/Admin.csproj"
COPY . .
WORKDIR "/src/Admin"
RUN dotnet build "Admin.csproj" -c Release -o /app/build
This section is going to build our app. We're using the official .NET 6 SDK image as the base for the build. We set the WORKDIR in the container to /src and then COPY over the csproj file from our project. Next we run a dotnet restore before copying over the rest of the files from our project to the container. Finally, we build the project by running dotnet build on our project file, while setting the configuration to release.
FROM build AS publish
RUN dotnet publish "Admin.csproj" -c Release -o /app/publish
The next section publishes our app. We use the previous section as a base and then RUN the dotnet publish command to publish the project.
FROM nginx:alpine AS final
WORKDIR /usr/share/nginx/html
COPY --from=publish /app/publish/wwwroot .
COPY ["Admin/nginx.conf", "/etc/nginx/nginx.conf"]
The last section produces our final image. We use the nginx:alpine image and start by setting the WORKDIR to /usr/share/nginx/html - this is the directory where we'll serve our application from. Next, we COPY over our published app from the previous publish section to the current working directory. Finally, we COPY over our custom nginx.conf file to replace the default one that comes with NGINX.
nginx.conf
In the root of the project we add a file called nginx.conf, with the following code.
events { }
http {
    include mime.types;

    server {
        listen 80;

        location / {
            root /usr/share/nginx/html;
            try_files $uri $uri/ /index.html =404;
        }
    }
}
NGINX will serve our app inside the container however, as our app is a Single Page Application, we need to tell NGINX to route all requests to index.html. Essentially we've setup a simple web server listening on port 80 with files being served from /usr/share/nginx/html. The try_files configuration tells NGINX to serve the index.html whenever it can't find the requested file on disk.
Portal configuration
We won't go into this one since it is excatly the same as the admin app configuration. In the Dockerfile only the word Admin is replaced with the consumers project name which is Portal.
The nginx.conf file is an excat copy of admin's.
Web Api configuration
The Web Api project only needs the Dockerfile. Here we won't need the nginx.conf, since Kestrel will be used as the web server for this project.
FROM mcr.microsoft.com/dotnet/aspnet:6.0 AS base
WORKDIR /app

FROM mcr.microsoft.com/dotnet/sdk:6.0 AS build
WORKDIR /src
COPY ["WebApi/WebApi.csproj", "WebApi"]
RUN dotnet restore "WebApi/WebApi.csproj"
COPY . .
WORKDIR "/src/WebApi"
RUN dotnet build "WebApi.csproj" -c Release -o /app/build

FROM build AS publish
RUN dotnet publish "WebApi.csproj" -c Release -o /app/publish

FROM base AS final
WORKDIR /app
COPY --from=publish /app/publish .
ENTRYPOINT ["dotnet", "WebApi.dll"]
The first 3 sections are pretty much the same as we elaborated above. Only difference is the last section.
FROM base AS final
WORKDIR /app
COPY --from=publish /app/publish .
ENTRYPOINT ["dotnet", "WebApi.dll"]
We set the WORKDIR to a folder called app in the container. Then COPY contents from publish to /app/publish. At the end, ENTRYPOINT tells Docker to configure the container to run as an executable.
Docker compose configuration
You could get rolling with these, and startup everthing via docker run but thats a bit of a husstle to do everytime. So we will run everthing through Docker Compose and wire things together easily.
We create 2 YAML files:
- proxy.yml - Contains code to run
reverse-proxyandacme-companion. - services.yml - Contains code to run
admin,portal, andwebapi.
In actuality you will probably need also a database, cache store, log store, blob storage and similar infrastructure apps which nowdays all run in containers. In that case I would suggest to have a sepparate infrastructure.yml file to startup all these supporting applications.
Docker bridge network
Before we jump into the YAML files we need to create a user-defined bridge network so all containers can connect to it. We do this by typing the following command in a terminal window.
docker network create −−driver bridge my-networkThe are many benefits of using a user-defined bridge network as opposed to the default one. But for our purposes the following are the most important.
- Automatic DNS resolution between containers - Very handy for our reverse proxy to route traffic to the specific containers by using their name.
- Better isolation between containers - We may have other containers in our host which we want to sepparate from this "stack".
proxy.yml
In the root of the solution we add a file called proxy.yml, with the following code:
version: '3'

services:
  reverse-proxy:
    image: nginxproxy/nginx-proxy:latest
    container_name: reverse-proxy
    restart: always
    ports:
      - 80:80
      - 443:443
    volumes:
      - conf:/etc/nginx/conf.d
      - vhost:/etc/nginx/vhost.d
      - html:/usr/share/nginx/html
      - certs:/etc/nginx/certs:ro
      - /var/run/docker.sock:/tmp/docker.sock:ro

  acme-companion:
    image: nginxproxy/acme-companion:latest
    container_name: acme-companion
    restart: always
    environment:
      NGINX_PROXY_CONTAINER: reverse-proxy
    volumes:
      - conf:/etc/nginx/conf.d
      - vhost:/etc/nginx/vhost.d
      - html:/usr/share/nginx/html
      - certs:/etc/nginx/certs:rw
      - acme:/etc/acme.sh
      - /var/run/docker.sock:/var/run/docker.sock:ro

volumes:
  conf:
    driver: local
  vhost:
    driver: local
  certs:
    driver: local
  acme:
    driver: local
  html:
    driver: local

networks:
  default:
    name: my-network
Let's break it down into sections.
reverse-proxy:
    image: nginxproxy/nginx-proxy
    container_name: reverse-proxy
    restart: always
    ports:
      - 80:80
      - 443:443
    volumes:
      - conf:/etc/nginx/conf.d
      - vhost:/etc/nginx/vhost.d
      - html:/usr/share/nginx/html
      - certs:/etc/nginx/certs:rw
      - /var/run/docker.sock:/tmp/docker.sock:ro
This section is for the reverse proxy container which handles routing to the appropriate services.
We pull the latest image nginx-proxy. Set the container_name to reverse-proxy as it is going to be used by the acme-companion container. Set restart command to always to make sure we pickup any changes when redeploying our proxied services (admin, portal, webpi). Map ports 80 and 443 of the container to the same ports on the host.
The mounted volumes are needed on nginx-proxy so that they can be shared with the acme-companion.
- /etc/nginx/certs:ro - Used to store certificates and private keys (ro = read-only).
- /usr/share/nginx/html - Used to write
http-01challenge files. - /etc/nginx/vhost.d - Required so the certificate authority (Let's Encrypt) can access the
http-01challenge files. - /tmp/docker.sock:ro - In case of using a container management tool like Portainer, this allows it to communicate with the docker daemon and manage our containers.
acme-companion:
    image: nginxproxy/acme-companion:latest
    container_name: acme-companion
    restart: always
    environment:
      NGINX_PROXY_CONTAINER: reverse-proxy
    volumes:
      - conf:/etc/nginx/conf.d
      - vhost:/etc/nginx/vhost.d
      - html:/usr/share/nginx/html
      - certs:/etc/nginx/certs:rw
      - acme:/etc/acme.sh
      - /var/run/docker.sock:/var/run/docker.sock:ro
This section is for the acme companion container which handles the automated creation, renewal and use of SSL certificates through the ACME protocol.
We pull the latest image acme-companion. This container doesn't expose any port to the internet.
The environmental variable NGINX_PROXY_CONTAINER is used to tell the companion, which is the name of the reverse proxy container to which it should place the certificates under. Since all our services share the same network, the companion container can access nginx-proxy just by using its container name.
The mounted volumes are shared with the once defined in nginx-proxy, the only two difference are:
/etc/nginx/certs:rw- The access is rw = read-write as this container creates and auto renewals the certificates and private keys./etc/acme.sh- Used to store theacme.shconfiguration and state.
volumes:
  conf:
    driver: local
  vhost:
    driver: local
  certs:
    driver: local
  acme:
    driver: local
  html:
    driver: local
This section defines all the volumes we are mounting above. The driver is set to local to indicate that we are creating the volumes inside the host.
Volumes can also be created on a external host and mounted to the local host.
networks:
  default:
    name: my-network
The last section is used to tell docker in which network should these 2 services run, which is our user-defined bridge network called my-network.
service.yml
In the root of the solution we add a file called services.yml, with the following code:
version: '3'

services:

  webapi:
    build:
      context: .
      dockerfile: WebApi/Dockerfile
    container_name: webapi
    expose:
      - 80
    environment:
      - VIRTUAL_HOST=api.mydomain.com
      - VIRTUAL_PORT=80
      - LETSENCRYPT_HOST=api.mydomain.com
      - LETSENCRYPT_EMAIL=myemail@mydomain.com

  admin:
    build:
      context: .
      dockerfile: Admin/Dockerfile
    container_name: admin
    depends_on:
      - webapi
    expose:
      - 80
    environment:
      - VIRTUAL_HOST=admin.mydomain.com
      - VIRTUAL_PORT=80
      - LETSENCRYPT_HOST=admin.mydomain.com
      - LETSENCRYPT_EMAIL=myemail@mydomain.com

  portal:
    build:
      context: .
      dockerfile: Portal/Dockerfile
    container_name: portal
    depends_on:
      - webapi
    expose:
      - 80
    environment:
      - VIRTUAL_HOST=portal.mydomain.com
      - VIRTUAL_PORT=80
      - LETSENCRYPT_HOST=portal.mydomain.com
      - LETSENCRYPT_EMAIL=myemail@mydomain.com

networks:
  default:
    name: my-network
Let's break it down into sections.
webapi:
    build:
      context: .
      dockerfile: WebApi/Dockerfile
    container_name: webapi
    expose:
      - 80
    environment:
      - VIRTUAL_HOST=api.mydomain.com
      - VIRTUAL_PORT=80
      - LETSENCRYPT_HOST=api.mydomain.com
      - LETSENCRYPT_EMAIL=myemail@mydomain.com
This section is for the Web Api project.
We set the context to the directory where this file resides (which is the root of our solution), and points to the Dockerfile which is in the subdirectory /WebApi/.
The container_name is used by the reverse proxy to route api traffic. It exposes only port 80 as requests can reach it only within the docker network (ports are not exposed to the host machine, only to other services in the network).
We also define 4 environmental variables which are going to be used by the reverse-proxy and acme-companion containers.
- VIRTUAL_HOST - Is the subdomain which is going to be mapped to a subdirectory with the same name in the
reverse-proxycontainer. - VIRTUAL_PORT - Is the port which
reverse-proxycan reach thewebapicontainer. If the proxied container exposes another port than the default 80, you can forcenginx-proxyto use this port via this variable. - LETSENCRYPT_HOST - Controls certificate creation and SSL enabling by the
acme-companion. - LETSENCRYPT_EMAIL - This is optional but it's a good practice to define an email when creating certificates.
Certificates will only be issued for containers that have both VIRTUAL_HOST and LETSENCRYPT_HOST variables set to domain(s) that correctly resolve to the host, provided the host is publicly reachable.
The other two sections are done the same way, the only two difference are:
- The host variables are set to
admin.mydomain.comandportal.mydomain.comrespectively. - Both services are depended on the
webapito start first, so we tell docker to start it beforehand via thedepends_oncommand.
The last section is used to tell docker in which network should these 3 services run, which is our user-defined bridge network called my-network.
Summary
This article was aimed to explain how to containerize a complex system composed from multiple Blazor WASM apps, ASPNET Core Web Api, NGINX & Let's Encrypt through the use of Docker Compose.
- We created 3 services: Admin, Portal, and WebApi.
- We created a reverse proxy to shield our internal service communications.
- We automated the process of creation, renewal and use of SSL certificates.
- Wired everthing through docker compose for an easier deployment process.
If you found this article helpful please give it a share in your favorite forums 😉.
The solution project is available on GitHub.